Showing posts with label cakes. Show all posts

Thursday, August 16, 2012

PacMan Birthday!

If there was an award for the worst blogger of all time, I would probably get it.  I’ve been so busy with work after a re-org that my writing has fallen aside a little.  Fortunately, I’ve still been baking, reviewing bakeries and keeping it real.  I’ve also developed an addiction for Fro-Yo.  What is it about self-serve frozen yogurt that gets people going?  Not to mention the ability to pour on the jimmies (sprinkles) until you can’t even see the fro-yo beneath only to have the high schooler at the register look at you judgingly?  Anywho, let’s talk baking!  One of my favorite days of the year is my birthday – if you know me and you’re reading this, you should know that!  Nine years ago on my birthday, my adorable sister did the unthinkable to steal my birthday thunder by having a child.  My nephew Braden was born and the entire family rejoiced in the hilarity that is having to share a birthday when all you live for is your birthday.  Incidentally, when Braden was old enough to understand that we “share” a birthday, he was none too pleased about it either.  In the years that followed “the birth” I have come to terms with the fact that a kid’s birthday always takes some sort of precedence.  So, as is the case, for many family birthday parties, I am the baker of choice for the cake! 
Braden is a huge video game fan.  He has all sorts of game devices:  a Wii, a Nintendo 3DS , an iPod touch pretty much devoted to game playing.  And through all of the amazing graphics and animations that are available for these systems, I was thrilled to find out that he is a huge PacMan fan.  I mean, what child of the 80’s didn’t love Pacman?  I still recall learning the ‘greater than’ and ‘less than’ signs in elementary school by drawing a little Pac man symbol around them and reasoning that Pacman would eat in the direction of more little dots.  Well it turns out that Pac man is now all souped up with some amazing graphics and faster moving ghosts and now he even moves in other directions besides right angles.  (How much math did we learn from PacMan?!)  So when Braden said he wanted Pac Man for his cake, how could I do anything but a round cake with a chunk cut out?!    But any idiot could do that.  And this idiot did…..  but PacMan is not a one man show.  He would have nothing if not for Inky, Winky, Pinky and Clyde – the famed “Ghosts”!  so It seemed like the perfect time to break out the air brush machine. 

I made a combo of vanilla and chocolate cupcakes – just a standard recipe for each and then covered them with an drape of fondant which I airbrushed to the appropriate bright colors.  Then a dollop of white chocolate for the eyes and how CUTE did these turn out!  I’m totally in love with them.  Without having kids of my own, I rarely get to experience the thrill of having other moms be completely jealous of what you made for your kids’ party.  Eat your hearts out moms!


Tuesday, May 15, 2012

A Magical Mothers' Day


When you’re the single gal in the midst of mothers, it becomes your responsibility to host Mothers’ Day brunch.  There are six women in my family and I am the younger of two non-mothers with the other being a fabulous aunt who should be celebrated as a mother regardless.  And since I was pent up in grad school the last few mothers’ days, I thought that I should offer to host a little party to celebrate my aunts, stepmom, sister and of course my charming, adorable, weird, pious, giving, hardworking mother:  Big Mama.   As the family baker, I’m pretty sure the gals were expecting something lovely.  Add into the mix that half are on a diet, or off carbs, or don’t want something heavy …like cake.  Oy.  I made a mix of brunchy things:  Crustless Quiche Muffins – yum!, a spectacular Kale Salad with red cabbage, peas, shallots, beets, and a little goat cheese in a fresh lemon “vinaigrette” – a big sautéed batch of Potatoes O’Brien, Grilled chicken – optional topping for the salad, Grilled Turkey Bacon (because I’m a veg and didn’t want my house to smell like dead pig), and a French Toast Casserole for the kiddies that were joining us.  Since I’ve really been on a no processed food/only natural foods kick in my own personal dietary psychosis, I decided that the bread for this should be home made.  Since I decided that last minute, I made my emergency bread or “beer bread” using 7up instead of beer.  Add a little  more sugar and you have a sweet citrusy bread that take 5 minutes to mix and less than an hour to bake.  BooYaH!
Mmmmm.....

So easy:

3 cups flour
1tbsp baking powder
3 tsp sugar
12 ounces beer or lemon/lime soda like 7Up
1 tsp salt

4tbsp butter

Stir first five ingredients until combined.  Melt butter and pour over batter in loaf pan.  Bake on 375 about 50 minutes.  If you're using a soda, you can add a bit more sugar and a tsp of lemon extract for extra sweetness and flavor. 


 For dessert, I made Pavolova in individual servings with a lemon curd filling, fresh whipped cream and a blueberry balsamic drizzle.  And because I like cake, I made an orange pound cake which was a total fail because I used my angel food cake pan instead of my bundt pan which I couldn’t find.  GRRR.  Since no cake gets wasted, I froze the chunks to make future cake pops.  Meh.  So in a pinch, and now handy angel food cake pan, I whipped up a quick lemon angel food cake. 
Here's a destroyed orange pound:


Let me talk about the pavlova a minute.  Or as long as I want, since it’s my blog!  Meringue is a beautiful thing.  Ever since my great Aunt Sis who lived next door made peppermint meringue cookies for Christmas when I was a wee snarkybaker, I have been hooked on the crunchy melt in your mouth magic of meringue.  So when a good friend was grinding up sugar in a food processer for pavlova, which she described as a soft on the inside but crusty on the outside meringue, I was intrigued.  I poked around on the internet and found this recipe which showed single serving pavlova cups that looked easy, and delicious.  They turned out perfect!  So pretty and quick to make.  Look how yummy they look!


Sunday, April 8, 2012

EASTER! A little cake with a lot of stuff!

I called dibs on making the cake for Easter this year.  You'd think that having a baking blog would entitle me to first dibs on all desserts for holidays but no such luck.  I'm not the only caker in this family.  So I wanted to make something simple and sortof small. I made a pretty simple almond cake - just one layer in a 9X13 pan.  And I've been wanting to make sheep cupcakes for a while so I thought it would be cute to have the sheep sortof grazing in a field. So when you wait until the day before Easter to get some supplies, you'll be sorry to find that everyone is making sheep cupcakes and has already snatched up the white miniature marshmallows from your grocery store.  Now anyone could just have settled for the multi-color minis but not this baker.  I recently saw some sheep for the first time (don't judge - I'm more of a city mouse...er sheep...er baker) and I know for a fact that they are not pink or mint green.  So I stood glaring at the empty marshmallow shelf for a while and checked out the other carts in aisle so I could start a marshmallow fist fight.  In my day dreaming of throwing down with some granny over one bag of mini-marsh, I had a revelation.  Marshmallows don't grow on trees!  They are made in factory which means I can totally make them at home.  Some phone googling showed me that it's basically just corn syrup, gelatin, sugar and water.  


When I got home, I did a full search and settled on the Smitten Kitchen recipe. I halved it and I used merigue powder instead of just egg whites or egg white powder.  It worked totally fine but the recipe didn't say how much of it to use so for my half recipe I used about 1/4 cup and a half cup of water to whip up into the stiff peaks.   I followed the recipe closely and even busted out my candy thermometer.  The only difference was that instead of pouring the marshmallow onto into a 9X13 pan, I used a piping bag to drop little round mini-marshmallows onto a powdered sugar covered pan.  The half recipe was way more than enough and my minis set in the fridge after only a few hours.  


So then it was just a small task to attach these little guys to cupcakes to make the adorable little sheep.  I just used a white buttercream on a vanilla upwrapped cupcake to make them stick.  


Then I just popped on a white jordon almond for a head and some tootsie roll feet and pink marshmallow ears.  


But sheep on a cake does not make Easter so I covered my original cake with fondant and then busted out a new toy: The Duff Airbrush Machine!


Where else would some sheep hang out except a green field full of flowers?  So first step was to spray the cake green.


Next, use leftover fondant and another new toy!  The Wilton Gum Paste Flowers Set.  The blue flower punches (in FOUR sizes!) from this set are so awesome and easy. Just like a cookie cutter that puts an imprint in the flower and then a little mat comes with it to imprint the other side too.  So fun!  I busted out over 100 flowers in less than an hour!  Then the only thing left to do was paint them.  Since my airbrush was set up and looking for some action I took white flowers to purple, pink and orange to make a fun floral collage.  


I bordered the cake with a thick bead of purple buttercream and stuck the flowers all around along with some large sprinkle dots.   And here it is!


Sunday, March 11, 2012

Sweet St. Patty's Day Shamrock Shake Cake

If you’re single and made it through Saint Valentine’s Day without slitting your wrists, I’m sure you’re looking forward to a more social holiday – Saint Patrick’s DAY!  Wahoo!  This month for me started out in Ireland and to continue celebrating my Irish heritage, I thought I’d devote this post to one of my favorite treats from this time of year:  The Shamrock Shake.  Since I don’t ever eat anything from the likes of a McDonald’s, it’s hard for me to look forward to something so delicious at a place that serves filler and chemicals and calls it food.  Since a SMALL Shamrock Shake is well over 500 calories (EEEK!!!), this is a treat that I get once a year at best – but really only once every two years since I  will only drink half.  YUM.  

The thing about the shamrock shake is that it has a sweet yet minty flavor combined with the fat in ice cream that makes everything better.  So if fat+mint+sugar=everything better, then what would we need to add to make everything better=everything awesome.  There is one clear answer – chocolate cake.  So I whipped up my standard chocolate cake in two 9in round pans. (recipe below)   I like this recipe because it turns out really moist with a deep flavor.  I used to omit the coffee and just use water but I think the coffee really does add an interesting note to the flavor – you can also use a flavored coffee for a slight change.  Anywho, while the cake’s a-bakin it’s time to make a minty green frosting. 

I used a standard buttercream frosting with about 2 tsp of peppermint extract and a smidge of green food color.  Then I chopped up some bittersweet chocolate for the chips in the frosting.  The only issue with this frosting is that the chips make it almost impossible to pipe.  The only way to really do it is to put it in a piping bag without a tip.  When in doubt, you can always pipe a dot border.  Mmmmm…minty green frosting dots. 

The cake turned out looking good and the frosting went way beyond my love of shamrock shakes – there are no bittersweet chips in the shake – take that McD’s!  Nor are there jimmies - I added the jimmies for dramatic effect - I think I got it.

CHOCOLATE CAKE!

2 c. sugar

1 3/4 c. flour

3/4 c. cocoa – dark cocoa is better if you can find it

2 tsp. baking soda

1 tsp. baking powder

1/2 tsp. salt

2 eggs

1 c. black coffee

1 c. buttermilk

1/2 c. vegetable oil

1 tsp. vanilla


Combine first 6 ingredients and set aside.

 In large bowl combine all other ingredients, mix. Add flour mixture a bit at a time until just combined, batter will be thin.

Beat at medium speed for 2 minutes. Pour into greased and floured 9 x 13 inch cake pan. Bake at 350 degrees for 35 to 40 minutes.

Monday, February 27, 2012

Why are there so many cakes about rainbows?


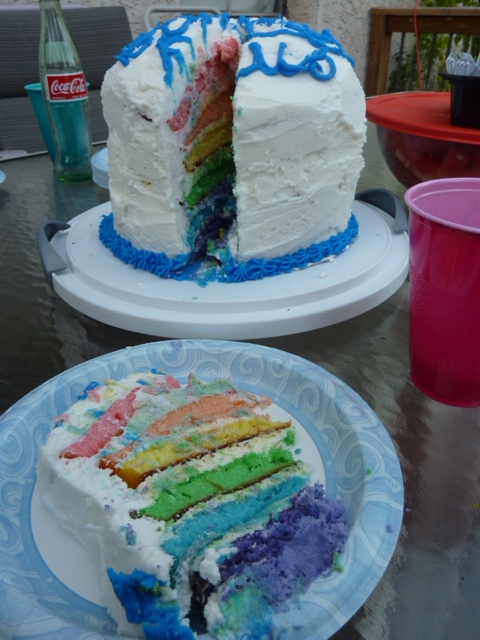
This weekend I had the profound pleasure of celebrating a friend’s 40th birthday.  He threw a huge bash with fun party treats like glow-necklaces, birthday cake martinis (shut up!), blinking ice cubes and a playlist that had me strap my groove on by 8pm.  No one throws a party like a gay dude.  I’ve had homosexuality on my mind recently for a few reasons – 1.  The awesome party that I knew was coming.  2.  A friend recently came out to our group of pals and 3.  The ridiculousness of how people’s personal lives are intertwined with our political system.  This isn’t a political blog so I won’t get too far into my opinions but when did a candidate’s religious based opinion become how we judge what is right for the country – in my book, if someone isn’t hurting other people and doesn’t break the foundation of our country’s values of everyone’s right to pursue happiness, then it shouldn’t be anyone’s business and certainly not part of a campaign platform.    Anywho, how can you celebrate the fabulousness of diversity without cake?  I made the cake below based on Whisk Kid’s idea for a rainbow layer cake.  I used a completely different vanilla cake recipe and used plain buttercream instead of the Swiss meringue version.  Her delightful recipe and pictures can be found here:  Whisk Kid RainbowCake.  Thanks for the brilliance Whisk Kid!


Here is what I learned –
Whisk Kid used 6 layers instead of 7 – but there are 7 colors in the rainbow.  But 6 is probably easier to stack.  Maybe that’s why she was on Martha Stewart and not me.

Even out your cake layers or your layers will break   and your cake will be round on top.  Whoops!

When you make this as a birthday cake for a straight dude, you’ll get funny looks and questions.

I apparently have no idea what color indigo is.  Blue?  Purple?  Purplish blue?  Wtf?!

Use more food coloring than you think you need – in rainbows there is no such thing as too much color.

Nonetheless - this one was a hit - really yummy and HUGE!


Not quite finished but already tall!                 


Monday, February 20, 2012

1 Amazing Kid and 1 Wimpy Kid


My nephew Braden is amazing.  When he was a toddler, he was diagnosed with Pervasive Developmental Disorder which is on the Autism Spectrum.  He’s now eight, and my sister has remained unrelenting in finding the tools that will help him function better among typical kids – be it a therapy, a sport, a playgroup, or working with his school counselor and teachers to make sure he gets the help he needs.   She’s awesome and  Braden is brilliant – he just made the honor roll but as with many autistic children, his social skills are not the same of a typical child.  Lots of autistic kids will play by themselves and some are non-communicative at all.  We’re lucky with Braden   - he talks pretty normally but wouldn’t necessarily go play with other kids.  His teacher this year has set up a book club once a week where kids can stay in from recess and talk about a book they are reading to help Braden with his social skills.  Right now they are reading Diary of a Wimpy Kid.  My lovely sister has been making treats for this event each week.  And when I suggested that the Wimpy Kid would make a totally cute and easy cakepop she said that she thought the kids would love it if I made cakepops.  So much for suggesting that she do it.  So I set to thinking about what I would need.  I figured I could use half a jelly bean for his nose and just pipe on his eyes and smile with black frosting but  I didn’t think the frosting would work as his hair and indeed – it didn’t. 


I finally settled on some black string licorice cut into quarter inch pieces.

I like this one the best:


 I showed the best one to Braden only for him to proclaim that he wanted cupcakes.  Oy.  But by this point I had already baked and crumbled a cake for cakepops.  So not to waste the opportunity to cover crumbs with white chocolate I made the cake pops without sticks.  I used a toothpick to dunk the balls into the melted chocolate and then another to push it off the first toothpick and onto a parchment lined pan.  Before it hardened I stuck half a white jelly bean on the front and three slivers of precut string licorice on the top as hair.  When I hardened I used black frosting to pipe on eyes, ears and a smile J  Since Braden wanted cupcakes, I decided to use these adorable little Wimpy Kids as toppers.  I whipped up a batch of chocolate cupcakes with vanilla buttercream and piped on a generous pile of frosting – I find giving third graders a lot of sugar mid-day is always a good idea when you don’t have any kids.  Then I popped the little Wimpy Kid heads right into the center and went from cute cupcakes to adorable overload!


I swear I will never get tired of people saying "Wow!" when they see something I made.  Especially kids!  

Friday, February 17, 2012

MMMMMMM....Beer caramel sauce

I don’t like beer – that’s right!  I said it!  I do like most other booze but I don’t much care for beer.  Beer bread on the other hand- - yum!  Beer cupcakes – oh yeah!  Beer in any form except for actual beer form is really what I’m looking for.  The ironic thing is that two of my very good friends actually own a beer company:  Evil Genius Beer Company.  Every time I take a swig of one of their new products, I think to myself –yep – tastes like beer!  I’m told it’s all really good and in fairness, their Good n’Evil Kolsh is pretty good – even for someone who’s not a beer drinker.  One of these dudes, Trevor, is one of my besties and listens to my overall life nonsense on a regular basis.  Like when I wonder if gnomes are real or if they are just little people with funny hats – Trevor is my go-to guy.  So when Trev asks for a cake, I’ll usually just make one for fear that he’ll stop listening to my crap. 

So their company is still pretty new and when they signed with a local Philly distributor, a celebration was in order.  Trevor called and asked for a cake to bring to the distributor and I easily agreed.  Now, when it comes to making cakes – I pretty much got a system but working beer in – well that’s always a challenge.  For their cake, I didn’t want to go too crazy – I’m not sure of the audience so what if they are all chocolate folks but I gave them banana flavor?  That’s a bad scene and I’m sure it’s not quite the response my pals would want.  I went with a vanilla layer.  I filled it with a delicious pastry cream – because I’m in a pastry cream phase – more on that another time.  But before I put it together, I assaulted my cake layers with the business end of a fork and made holes all over.  Then I poured a spiced beer caramel sauce made from my buddies’ beer.  That’s right – and old fashioned poke cake!  Why don’t we appreciate poke cakes more?  They can turn a dry cake into a food-gasm in the space of 2 seconds.  I mean when other stuff is dry, we moisten it right?  Why not cake? And honestly, have you ever poured caramel over anything and regretted it?  Me either.   So I whipped up some beer caramel – or rather, I experimented with hot sugar and beer.    I got to something that seemed lovely and so the recipe is below – it’s should come as no surprise that it’s beer, sugar, and cream – wtf else would it be? 
Finally, I attemped to make their Good n’ Evil logo – a true labor of love.  There is a chic on there with a horn and a halo – hence good n’ evil.  Trevor calls her…..I forget – I listen to his crap too but sometimes when he’s talking I think about cupcakes or rainbows.  Anywho, the chic and some pretty intriqite hops all outlined in an oval with a  banner going across makes for some pretty challenging detail work.  The rest of the label at first appears just a golden color but as it turns out, has a very faint hops-like pattern.  Here is my version of their logo in fondant:

I rolled out and cut – kindof freehand and kindof using some paper cutouts as a guide.  The hard part was getting the details right.  I was still pretty new at fondant so I wasn’t sure the best method to use was.  I started  with just those edible markers from  Americolor.  That wasn’t really giving the effect I was hoping for so then I considered piping but that doesn’t have enough control for such small specific details.  Finally, I made myself a “paint” using vodka and food color gels.  At the end, I was pretty proud of it. 
Here is the final cake – covered in fondant that I sprayed gold and then went over with some of my vodka paint.  I also used it to paint on the faint hops pattern. Here is the finished product.  I was pretty proud of it at the time and I still am but now I think I'd work a little harder to get the fondant even.  


Here is how I made the beer caramel:

24 oz beer
2 c. brown sugar
1 c. white sugar
2 tbsp butter
2 c. heavy cream
1 tbsp vanilla extract

Boil the beer until you're down to about a cup left.  The alcohol will boil out first and then the water.  It takes a while. 
Add in both sugars and stir gently
Let simmer and when it looks like the sugar has dissolved, add in the butter.  Continue to simmer until you get to a  caramel color and it becomes syrupy.  If you're not sure you're there yet - try the ball method of testing.  Drop a bit into a glass of cool water and if the syrup balls up, holding it's form rather than just dissolving into the water, you're probably good to go.
When your at a deep amber color and you've reached the syrup stage, you're ready to add the cream. BE CAREFUL!  When you add the cream, it is likely to boil violently!  I usually add the cream with my hand and arm covered with a dishtowel in case it splatters. 
The boil will drop down quickly and then you can just stir and you're pretty much done.  If it seems that the cream has cooled the mixtures down too much and you have some solid chunks, keep it on the heat for a bit until those melt. 
Stir in the vanilla - I also splashed in some cinnamon extract  to get a nice "spiced" flavor.

Voila! done! 

You could keep this caramel in the sauce in a tighly covered jar and refrigerate - I wouldn't use it beyond a week or 10 days though. 

Sunday, February 12, 2012

Learning Fondant

A few years ago I didn't even know what fondant was.  I'm still not entirely sure I know what it is except that it's awesome.  If you're a caking kinda gal - or dude - you probably already know and love fondant for its flexible options as far as making smooth surfaces that can be airbrushed, painted or piped upon.  It also can be shaped, molded and cut into anything.  I think the best part of fondant is that it's fun!  It's like playdough for grown-ups.  My first forray into fondant was for my nephew's 6th birthday.  As a huge fan of the Flyers and future NHL star, he wanted a hockey cake.  He wanted it to be in the team colors with their logo.  Then every day or so, he'd call me to ask me how his cake was coming and then he would request more features.  First he wanted an ice rink, then a hockey stick, then a hockey "guy".  I wasn't sure about using fondant but how hard could it be?  All the descriptions online and on tv made it sound easy peasy.  And for the most part it was pretty easy to figure out.  I picked up some of the typical tools from Wilton, a few tubs of their precolored fondant, a roller and some of those edible ink markers.  Looking back, it's not bad for a first attempt but anyone who would see it would definitey think "hmph! amateur!". It certainly wouldn't win me any prizes on Cake Wars.  (Which I totally think about winning when I'm making a cake.)   I think this cake was a good lesson in knowing your audience.  When I brought the cake to my sister's house in preparation for the ice skating party my nephew was so excited!  Seeing his eyes light up and proclamations of "WOW!" was such an awesome feeling.  And one of the best moment of my life was when asked if he liked it he said "I LOVE IT!"    Here is my first fondant cake - it's a standard vanilla cake - I'll post my recipe another time - with pastry cream filling.  It's mostly buttercream frosting with the ice rink, hockey stick and "guy" made from fondant.  In hindsight, I'd probably have used gum paste.

A note on store-bought fondant.  Lots of folks don't seem to like the premade stuff. It's ok.  I don't find it as delicious as buttercream but I don't think anything is as good as buttercream - I'd have buttercream oatmeal with buttercream coffee and a buttercream banana for breakfast everyday if I could.  The store-bought stuff works - there's always a consistency and the pre-colored stuff does save a lot of time.  I've made fondant myself and there's a time and place for that too.  More on the store-bought fondant vs. homemade another time...

Awesome amateur hockey cake: